Zephyr Bootloader 开发指南
本文介绍zephyr bootloader使用方法,及相关demo展示的操作步骤配置。
相关工程位置:
Bootloader:
bootloader/mcuboot/boot/zephyrApp:
zephyr/samples_panchip/hello_world
文章分为三部分
功能说明:对boot的功能,区域划分做整体描述
工程编译烧录:包括mcuboot工程及hello world(test sample)
mcuboot:编译时包括5种编译方式,对应4种升级方式(其中第四种BOOT_DIRECT_XIP方式,可以选择是否可以revert)
hello_world:测试app程序,包括2种编译方式(以code-partition作为区分),编译后的固件通过imgtool处理有2种方式,区分升级程序是否为confirmed程序
演示说明: 对相对应得5种升级方式做演示说明
总结说明:补充一些说明
1 功能说明
mcuboot为官方bootloader程序,支持的平台包括zephyr/mynewt等,我们基于zephyr平台,需要编译生成可与zephyr主程序交互的boot程序,来完成固件的解签,升级,标志固件信息等操作
参考官方连接:
zephyr中关于mcuboot 升级功能介绍
https://docs.zephyrproject.org/latest/guides/device_mgmt/dfu.html?highlight=mcuboot
mcuboot官方文档介绍
https://docs.mcuboot.com/
https://docs.mcuboot.com/design.html 描述固件升级细节
mcuboot关于zephyr应用介绍
https://www.mcuboot.com/documentation/readme-zephyr/
其他参考文档
https://blog.csdn.net/u010018991/article/details/79475166
https://blog.csdn.net/lt6210925/article/details/119519261
1.1 程序划分
带bootloader的程序,支持升级时,通常会按照以下区域进行划分
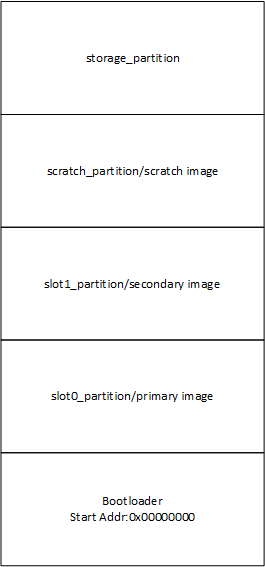
Zephyr Flash区域划分
bootloader:0x0地址程序,上电运行bootloader主程序
slot0_partition:app主固件程序地址,作为image时,通常具有header和tailer,并在image尾部有签名信息用来确认固件正确性可靠性,tailer用来存放magic pad和升级固件信息(swap_type,copy_done,image_ok)
slot1_partition:app待升级固件存放区域,形式如slot1_partition,但升级后的tailer会被擦除
scratch_partition:可选区域,临时存放固件交换区域,相较于不带scratch的升级方式,此种类型固件搬运有一定保障性
storage_partition:存放存储内容区域,固件升级时通常可以选择不处理
1.2 image格式
初始编译的app程序,对头部进行了500Bytes的偏移用作image header,主要存放固件版本固件大小等信息。
image程序大小结束位置存放hash及签名信息,用来确认固件的完整正确性
image总大小结束位置存放image的状态信息,用来管理升级交换方式
1.2.1 image header
大小:500Bytes=0x200
位置:存放于image头部区域
存放信息:
struct image_version {
    uint8_t iv_major;
    uint8_t iv_minor;
    uint16_t iv_revision;
    uint32_t iv_build_num;
};

/** Image header.  All fields are in little endian byte order. */
struct                                        image_header {
    uint32_t ih_magic;
    uint32_t ih_load_addr;
    uint16_t ih_hdr_size;           /* Size of image header (bytes). */
    uint16_t ih_protect_tlv_size;   /* Size of protected TLV area (bytes). */
    uint32_t ih_img_size;           /* Does not include header. */
    uint32_t ih_flags;              /* IMAGE_F_[...]. */
    struct image_version ih_ver;
    uint32_t _pad1;
};
作用:存放固件版本固件大小等信息
1.2.2 image sign infor
位置:image 尾部
存放信息:
hash值
根据固定private+hash值生成的签名信息
作用:存放hash值及签名信息
1.2.3 image trailer
位置:image总大小的末尾
存放信息:
/* This is not actually used by mcuboot's code but can be used by apps
 * when attempting to read/write a trailer.
 */
struct image_trailer {
    uint8_t swap_type;
    uint8_t pad1[BOOT_MAX_ALIGN - 1];
    uint8_t copy_done;
    uint8_t pad2[BOOT_MAX_ALIGN - 1];
    uint8_t image_ok;
    uint8_t pad3[BOOT_MAX_ALIGN - 1];
    uint8_t magic[16];
};
作用:用来判断swap类型,处理搬运信息,判断固件正确性以及固定magic pattern标识
1.2.4 imgtool
位于bootloader\mcuboot\scripts的imgtool为处理原始image的python脚本,目的是生成待烧录到对应分区的2个bin文件(分为Not Confirmed和Confirmed,此2个文件根据pad构建生成)
操作方式如下:
根路径下打开powershell,执行如下指令
python bootloader\mcuboot\scripts\imgtool.py sign --key bootloader\mcuboot\root-rsa-2048.pem --header-size 0x200 --align 8 --version 1.x --slot-size 0x10000 --pad --confirm build\hello_world_test_board\zephyr\zephyr.bin build\hello_world_test_board\zephyr\signed1.x.bin
–key :跟签名key信息,需要与Bootloader config宏所对应的解签方式对应
CONFIG_BOOT_SIGNATURE_TYPE_RSA–header-size :header大小固定0x200Bytes
–align :8
–version :version版本1.x
–slot-size 0x10000:image trailer存放末尾位置
–pad:为image添加trailer,升级固件所必须的pad magic的添加命令
–confirm:为image trailer添加confirm信息,存在则升级方式为permanent,否则为test方式
后接原始文件路径及生成固件路径
1.3 升级方式
固件升级分为4种方式,通过prj.conf文件中进行四选一
if !SINGLE_APPLICATION_SLOT
choice
	prompt "Image upgrade modes"
	default BOOT_SWAP_USING_MOVE if SOC_FAMILY_NRF
	default BOOT_SWAP_USING_SCRATCH

config BOOT_SWAP_USING_SCRATCH
	bool "Swap mode that run with the scratch partition"
	help
	  This is the most conservative swap mode but it can work even on
	  devices with heterogeneous flash page layout.

config BOOT_UPGRADE_ONLY
	bool "Overwrite image updates instead of swapping"
	help
	  If y, overwrite the primary slot with the upgrade image instead
	  of swapping them. This prevents the fallback recovery, but
	  uses a much simpler code path.

config BOOT_SWAP_USING_MOVE
	bool "Swap mode that can run without a scratch partition"
	help
	  If y, the swap upgrade is done in two steps, where first every
	  sector of the primary slot is moved up one sector, then for
	  each sector X in the secondary slot, it is moved to index X in
	  the primary slot, then the sector at X+1 in the primary is
	  moved to index X in the secondary.
	  This allows a swap upgrade without using a scratch partition,
	  but is currently limited to all sectors in both slots being of
	  the same size.

config BOOT_DIRECT_XIP
	bool "Run the latest image directly from its slot"
	help
	  If y, mcuboot selects the newest valid image based on the image version
	  numbers, thereafter the selected image can run directly from its slot
	  without having to move/copy it into the primary slot. For this reason the
	  images must be linked to be executed from the given image slot. Using this
	  mode results in a simpler code path and smaller code size.

endchoice
简单介绍四种方式的升级功能:
带scratch区的升级:BOOT_SWAP_USING_SCRATCH
此种方式对flash占用相对较大,升级时,分为三步
slot2_partition搬运到scratch_partition
slot1_partition搬运到slot2_partition
scratch_partition搬运到slot1_partition
不带scratch区的搬运升级:BOOT_UPGRADE_ONLY
直接将slot2_partition搬运到slot1_partition
不带scratch区的交换固件:BOOT_SWAP_USING_MOVE
交换slot1_partition和slot2_partition
不带scratch区的,不进行搬运的升级:BOOT_DIRECT_XIP
此种方式通过选择宏
CONFIG_BOOT_DIRECT_XIP_REVERT决定是否revert,分为2种子方式slot1_partition和slot2_partition不需要搬运
但需要注意不同partition的code内,code_partion对应的slot_partion需要在编译时对应,主要用于编译生成不同的bin文件时使用
例如,编译slot2_partion时,需要在
board.dtsi文件内,进行相关对应chosen { zephyr,console = &uart0; zephyr,shell-uart = &uart0; zephyr,bt-mon-uart = &uart0; zephyr,bt-c2h-uart = &uart0; zephyr,sram = &sram0; zephyr,flash = &flash0; zephyr,code-partition = &slot0_partition; };
2 工程编译烧录
工程编译烧录介绍mcuboot(bootloader project),以及hello world的编译,烧录方式
2.1 MCUBOOT
mcuboot为bootloader的project,包括五种编译方式,对应四种升级方式
2.1.1 功能概述
目前Boot程序可以完成以下功能
解密签名
判断固件信息进行upgrade,有以下五种方式
带scratch区的升级
不带scratch区的搬运升级
不带scratch区的交换固件
不带scratch区的,不进行搬运的升级
不带scratch区的,不进行搬运的升级,并支持非confirm回退
程序跳转
2.1.2 环境要求
board: pan1080a_afld_evb
uart (option): 显示串口log
2.1.3 编译和烧录
项目位置:bootloader/mcuboot/boot/zephyr
mcuboot包括5种编译方式,需要在boot/zephyr/prj.conf中关注5个config宏,根据选择升级方式,选择使用的宏
# chioce one upgrade type
CONFIG_BOOT_SWAP_USING_SCRATCH=y
CONFIG_BOOT_UPGRADE_ONLY=y
CONFIG_BOOT_SWAP_USING_MOVE=y
CONFIG_BOOT_DIRECT_XIP=y
CONFIG_BOOT_DIRECT_XIP_REVERT=y
方式一(默认):
# chioce one upgrade type
# CONFIG_BOOT_SWAP_USING_SCRATCH=y
# CONFIG_BOOT_UPGRADE_ONLY=y
CONFIG_BOOT_SWAP_USING_MOVE=y
# CONFIG_BOOT_DIRECT_XIP=y
# CONFIG_BOOT_DIRECT_XIP_REVERT=y
方式二:
# chioce one upgrade type
CONFIG_BOOT_SWAP_USING_SCRATCH=y
# CONFIG_BOOT_UPGRADE_ONLY=y
# CONFIG_BOOT_SWAP_USING_MOVE=y
# CONFIG_BOOT_DIRECT_XIP=y
# CONFIG_BOOT_DIRECT_XIP_REVERT=y
方式三:
# chioce one upgrade type
# CONFIG_BOOT_SWAP_USING_SCRATCH=y
CONFIG_BOOT_UPGRADE_ONLY=y
# CONFIG_BOOT_SWAP_USING_MOVE=y
# CONFIG_BOOT_DIRECT_XIP=y
# CONFIG_BOOT_DIRECT_XIP_REVERT=y
方式四:
# chioce one upgrade type
# CONFIG_BOOT_SWAP_USING_SCRATCH=y
# CONFIG_BOOT_UPGRADE_ONLY=y
# CONFIG_BOOT_SWAP_USING_MOVE=y
CONFIG_BOOT_DIRECT_XIP=y
# CONFIG_BOOT_DIRECT_XIP_REVERT=y
方式五:
# chioce one upgrade type
# CONFIG_BOOT_SWAP_USING_SCRATCH=y
# CONFIG_BOOT_UPGRADE_ONLY=y
# CONFIG_BOOT_SWAP_USING_MOVE=y
CONFIG_BOOT_DIRECT_XIP=y
CONFIG_BOOT_DIRECT_XIP_REVERT=y
示例:
以pan1080a_afld_evb为例,在 SDK目录打开 PAN1080 SDK CLI后, 可以用如下命令执行编译和下载:
编译
west build -d build/mcuboot_test_board -b pan1080a_afld_evb bootloader/mcuboot/boot/zephyr
下载
west flash -d build/mcuboot_test_board -r jlink
2.2 Hello World
hello_world为app层对应演示sample,可以区分编译链接code地址(通过flash_map中的code_partition映射),并在后续的工具处理中,可以选择是否为confirmed固件
2.2.1 功能概述
当需要配合mcuboot进行升级跳转展示时,需要hello world完成以下功能
打印基础信息
hello_world打印image header信息,包括version版本
2.2.2 环境要求
board: pan1080a_afld_evb
uart (option): 显示串口log
2.2.3 编译链接
项目位置:zephyr/samples_panchip/hello_world
hello world包括2中编译方式,对应code_partition位置不同,其中不需要搬运的升级方式,需要根据对应需要下载位置,修改01_SDK/zephyr/boards/arm/pan1080a_afld_evb/pan1080a_afld_evb.dts中的flash map的code_partition进行修改
chosen {
		zephyr,console = &uart0;
		zephyr,shell-uart = &uart0;
		zephyr,bt-mon-uart = &uart0;
		zephyr,bt-c2h-uart = &uart0;
		zephyr,sram = &sram0;
		zephyr,flash = &flash0;
		zephyr,code-partition = &slot0_partition;
	};
示例:
以pan1080a_afld_evb为例,在 SDK目录打开 PAN1080 SDK CLI后, 可以用如下命令执行编译,在对应工程build目录下生成zephyr.bin:
west build -d build/hello_world_test_board -b pan1080a_afld_evb zephyr/samples_panchip/hello_world
2.2.4 工具处理
imgtool处理已编译的zephyr.bin,包括对image固件添加header(版本大小),对image结尾位置后进行签名,为升级时添加需要的pad及confirm信息
版本号生成
通过--version 1.x命令 为固件添加具体固件版本信息,例如--version 1.0即为固件添加版本为1.0.0.0的image header信息。
是否为confirmed固件,分为以下2类示例命令:
不含confirm的烧录固件示例如下:
west根路径下打开powershell 运行命令
python bootloader\mcuboot\scripts\imgtool.py sign --key bootloader\mcuboot\root-rsa-2048.pem --header-size 0x200 --align 8 --version 1.x --slot-size 0x10000 --pad build\hello_world_test_board\zephyr\zephyr.bin build\hello_world_test_board\zephyr\signed1.x.bin
分别生成两个版本的hello_world程序,需要对应signed.bin文件的目录,例如分别生成signed1.0.bin,signed1.1.bin
包含confirm的烧录固件示例如下:
west根路径下打开powershell 运行命令
python bootloader\mcuboot\scripts\imgtool.py sign --key bootloader\mcuboot\root-rsa-2048.pem --header-size 0x200 --align 8 --version 1.x --slot-size 0x10000 --pad ——confirm build\hello_world_test_board\zephyr\zephyr.bin build\hello_world_test_board\zephyr\signed_confirm1.x.bin
分别生成两个版本的hello_world程序,pad构建为confirmed,需要对应signed.bin文件的目录,例如分别生成signed_confirm1.0.bin,signed_confirm1.1.bin
2.2.5 烧录
烧录时不是烧录原始的zephyr.bin文件,需要将工具处理后的文件,通过jflash烧录至对应区域,分别为0x40000和0x50000区域,具体烧录地址在演示说明中对不同升级方式区分描述
3 演示说明
以下对mcuboot编译的五种升级方式,hello_world编译并且通过工具处理的两种固件形式(是否经过confirm标识),进行测试现象描述说明:
三种搬运跳转升级方式(对应下文Method1,2,3)说明
升级过程的验证进行时,主要方式是搬运 原有程序存在于slot0,待升级固件(程序链接起始地址0x40000/slot0地址)当通过某种方式(flash烧录/OTA传输)存在于slot1时,重启会对程序进行搬运处理操作,三种方式处理细节有区别(下文会详细展示),最终将存放于slot1的程序搬运至slot0,搬运结束后会进行一次跳转。
根据slot1存放的固件是否进行过confirm的trailer pad添加,区分为confirmed固件或者not confirmed固件。
confirmed固件——第一次reset搬运后,固件之后会标记为perm(permanent/永久的),之后再reset便不会发生变化
not confirmed固件–第一次reset时,固件搬运结束后跳转slot0运行,由于非confirm的固件,只能作为1次测试,此时log显示test,第二次复位时,会将之前存在的固件进行revert操作,还原为之前slot存在的固件并跳转运行,输出log revert,而之后再进行的复位,由于revert标准位的存在,便不会再次进行升级操作。
前三种方式验证时可以通过固件的版本来判断运行的是哪个固件,而固件版本本身不会影响升级是否进行。
两种跳转升级方式(对应下文的Method 4,5)说明
升级过程未进行搬运 程序编译链接时,需要按存放区域构建对应的链接地址(存放于slot0的固件需要code-partition链接slot0区域,而存放于slot1的固件需要code-partition链接slot1区域)当slot0或slot1区域只存在一个固件时,首次上电便会跳转存在固件的起始地址,而当slot0,slot1同时存在固件时,首次上电会对固件进行版本比对,跳转运行较高版本的固件。
Method 4和Method 5升级方式区别在于,Method 5支持对固件的confirm信息进行判断,版本比对在首次上电逻辑相同,而第二次上电时,上一次跳转的程序若为not confirmed固件,则会对上一固件进行擦除,并且跳转至另一区域固件,同样的,再次上电若仍为not confirmed固件,则会继续擦除,并最终进行3次复位后,在flash code区域不存在可运行的image。
后两种方式的固件版本信息不光可以用来区分跳转后的程序内容,还为跳转逻辑提供比对依据。
以下对5种模式构建了验证方式,参照例图,对运行模式的说明和演示。
mcuboot编译方式 |
hello world编译方式 |
hello world工具处理 |
对应升级演示 |
|---|---|---|---|
CONFIG_BOOT_SWAP_USING_SCRATCH=y |
code_partion = slot0_partition |
–pad |
Method1(Not confirmed) |
CONFIG_BOOT_SWAP_USING_SCRATCH=y |
code_partion = slot0_partition |
–pad –confirm |
Method1(confirmed) |
CONFIG_BOOT_UPGRADE_ONLY=y |
code_partion = slot0_partition |
–pad |
Method2(Not confirmed) |
CONFIG_BOOT_UPGRADE_ONLY=y |
code_partion = slot0_partition |
–pad –confirm |
Method2(confirmed) |
CONFIG_BOOT_SWAP_USING_MOVE=y |
code_partion = slot0_partition |
–pad |
Method3(Not confirmed) |
CONFIG_BOOT_SWAP_USING_MOVE=y |
code_partion = slot0_partition |
–pad –confirm |
Method3(confirmed) |
CONFIG_BOOT_DIRECT_XIP=y |
code_partion = slotx_partition |
–pad |
Method4(Not confirmed) |
CONFIG_BOOT_DIRECT_XIP=y |
code_partion = slotx_partition |
–pad –confirm |
Method4(confirmed) |
CONFIG_BOOT_DIRECT_XIP=y |
code_partion = slotx_partition |
–pad |
Method5(Not confirmed) |
CONFIG_BOOT_DIRECT_XIP=y |
code_partion = slotx_partition |
–pad –confirm |
Method5(confirmed) |
下述示例演示过程中,首先需要准备2种固件版本,烧录至slot0(0x40000)的hello_world程序通过imgtool处理为1.0.0.0,作为原始固件,烧录至slot1(0x50000) 的hello_world程序通过imgtool处理为1.1.0.0,作为待升级固件。
烧录结束后,通过观察reset后的log,可以验证不同方法下升级跳转后具体的运行版本是否符合预期。
3.1 Method 1
默认不带scratch区的交换固件,mcuboot sample的prj.conf配置如下
# chioce one upgrade type
# CONFIG_BOOT_SWAP_USING_SCRATCH=y
# CONFIG_BOOT_UPGRADE_ONLY=y
CONFIG_BOOT_SWAP_USING_MOVE=y
# CONFIG_BOOT_DIRECT_XIP=y
# CONFIG_BOOT_DIRECT_XIP_REVERT=y
boot程序默认使用第三种方式不带scratch区的交换固件进行跳转升级,升级流程如下图所示,confirmed固件进行1步reset,而不带confirmed固件需要2步reset,分别运行
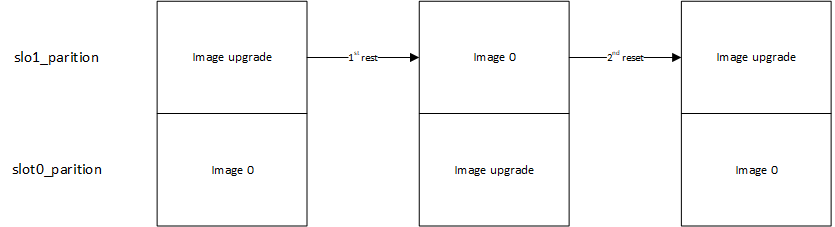
Boot Method 1
3.1.1 Not Confirmed
当烧录至slot 1(0x50000/secondary image)的程序为不含confirm程序时
复位第一次后,程序将打印test信息,运行搬运跳转后,运行版本为1.1.0.0
复位第二次后,程序将打印revert信息,运行搬运跳转后,运行版本为1.0.0.0
复位第三次后,程序将打印none信息,不进行搬运,运行跳转后,运行版本为1.0.0.0
3.1.2 Confirmed
当烧录至slot 1(0x50000/secondary image)的程序为confirm程序时
复位第一次后,程序将打印perm信息,运行搬运跳转后,运行版本为1.1.0.0
复位第二次后,程序将打印none信息,不进行搬运,运行跳转后,运行版本为1.1.0.0
3.2 Method 2
带scratch区的升级,mcuboot sample的prj.conf配置如下
# chioce one upgrade type
CONFIG_BOOT_SWAP_USING_SCRATCH=y
# CONFIG_BOOT_UPGRADE_ONLY=y
# CONFIG_BOOT_SWAP_USING_MOVE=y
# CONFIG_BOOT_DIRECT_XIP=y
# CONFIG_BOOT_DIRECT_XIP_REVERT=y
boot程序默认使用第三种方式不带scratch区的交换固件进行跳转升级,升级流程如下图所示,confirmed固件进行1步reset,而不带confirmed固件需要2步reset,分别运行
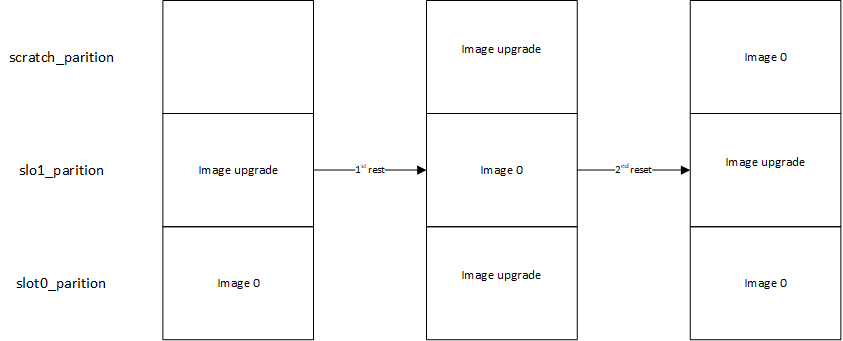
Boot Method 2
3.2.1 Not Confirmed
当烧录至slot 1(0x50000/secondary image)的程序为不含confirm程序时
复位第一次后,程序将打印test信息,运行搬运跳转后,运行版本为1.1.0.0
复位第二次后,程序将打印revert信息,运行搬运跳转后,运行版本为1.0.0.0
复位第三次后,程序将打印none信息,不进行搬运,运行跳转后,运行版本为1.0.0.0
3.2.2 Confirmed
当烧录至slot 1(0x50000/secondary image)的程序为confirm程序时
复位第一次后,程序将打印perm信息,运行搬运跳转后,运行版本为1.1.0.0
复位第二次后,程序将打印none信息,不进行搬运,运行跳转后,运行版本为1.1.0.0
3.3 Method 3
不带scratch区的搬运升级,mcuboot sample的prj.conf配置如下
# chioce one upgrade type
# CONFIG_BOOT_SWAP_USING_SCRATCH=y
CONFIG_BOOT_UPGRADE_ONLY=y
# CONFIG_BOOT_SWAP_USING_MOVE=y
# CONFIG_BOOT_DIRECT_XIP=y
# CONFIG_BOOT_DIRECT_XIP_REVERT=y
boot程序默认使用第三种方式不带scratch区的搬运固件进行跳转升级,升级流程如下图所示,confirmed固件进行1步reset,而不带confirmed固件需要2步reset,分别运行
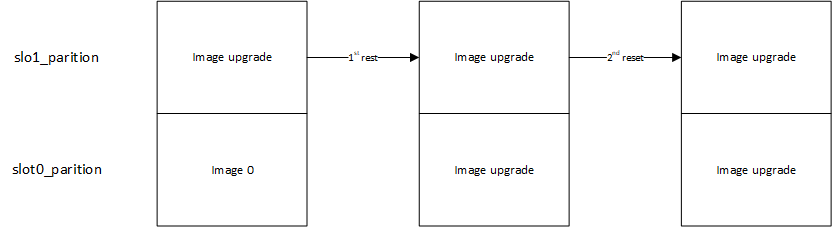
Boot Method 3
3.3.1 Not Confirmed
当烧录至slot 1(0x50000/secondary image)的程序为不含confirm程序时
复位第一次后,程序将打印test信息,运行搬运跳转后,运行版本为1.1.0.0
复位第二次后,程序将打印none信息,不进行搬运,运行跳转后,运行版本为1.1.0.0
3.3.2 Confirmed
当烧录至slot 1(0x50000/secondary image)的程序为confirm程序时
复位第一次后,程序将打印perm信息,运行搬运跳转后,运行版本为1.1.0.0
复位第二次后,程序将打印none信息,不进行搬运,运行跳转后,运行版本为1.1.0.0
3.4 Method 4
默认不带scratch区的,不进行搬运的升级,mcuboot sample的prj.conf配置如下
# chioce one upgrade type
# CONFIG_BOOT_SWAP_USING_SCRATCH=y
# CONFIG_BOOT_UPGRADE_ONLY=y
# CONFIG_BOOT_SWAP_USING_MOVE=y
CONFIG_BOOT_DIRECT_XIP=y
# CONFIG_BOOT_DIRECT_XIP_REVERT=y
固件准备流程发生变化
hello_world准备
准备primary image时,01_SDK\zephyr\boards\arm\pan1080a_afld_evb\pan1080a_afld_evb.dts中确认code-partition为slot0_partition
zephyr,code-partition = &slot0_partition;
准备secondary image时,01_SDK\zephyr\boards\arm\pan1080a_afld_evb\pan1080a_afld_evb.dts中确认code-partition为slot1_partition
zephyr,code-partition = &slot1_partition;
分别通过imgtool生成不同版本的固件通过jflash进行烧录,升级流程如下图所示,confirmed固件进行1步reset,而不带confirmed固件需要2步reset,分别运行

Boot Method 4
3.4.1 Not Confirmed
当烧录至slot 1(0x50000/secondary image)的程序为不含confirm程序时
最终reset通过版本判断,会通过bootloader程序跳转到不同的partition,运行较高版本固件
3.4.2 Confirmed
当烧录至slot 1(0x50000/secondary image)的程序为confirm程序时
最终reset通过版本判断,会通过bootloader程序跳转到不同的partition,运行较高版本固件
3.5 Method 5
默认不带scratch区的,不进行搬运的升级,支持回退版本的升级,mcuboot sample的prj.conf配置如下
# chioce one upgrade type
# CONFIG_BOOT_SWAP_USING_SCRATCH=y
# CONFIG_BOOT_UPGRADE_ONLY=y
# CONFIG_BOOT_SWAP_USING_MOVE=y
CONFIG_BOOT_DIRECT_XIP=y
CONFIG_BOOT_DIRECT_XIP_REVERT=y
固件准备流程发生变化
hello_world准备
准备primary image时,zephyr\boards\arm\pan1080a_afld_evb\pan1080a_afld_evb.dts中确认code-partition为slot0_partition
zephyr,code-partition = &slot0_partition;
并通过imgtool进行待升级固件生成带或者不带confirmed固件,留作后续使用
准备secondary image时,zephyr\boards\arm\pan1080a_afld_evb\pan1080a_afld_evb.dts中确认code-partition为slot1_partition
zephyr,code-partition = &slot1_partition;
并通过imgtool进行待升级固件生成带或者不带confirmed固件,留作后续使用
通过jflash进行烧录不同的固件到对应区域(如slot0需要对应0x40000,slot1需要对应0x50000),升级流程如下图所示,confirmed固件进行1步reset,而不带confirmed固件需要3步reset,分别运行
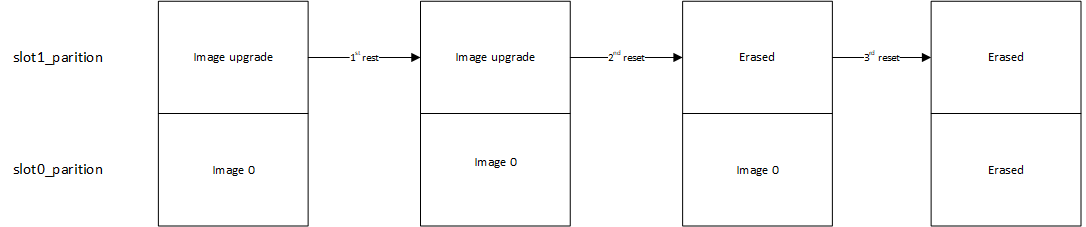
Boot Method 5
3.5.1 Not Confirmed
当烧录至slot 0(0x40000/secondary image)的程序为不含confirm程序,烧录至slot 1(0x50000/secondary image)的程序为不含confirm程序时
复位第一次后,运行compare后,跳转到slot1_partition,运行版本为1.1.0.0
复位第二次后,擦除slot1后,跳转到slot0_partition,运行版本为1.0.0.0
复位第三次后,擦除slot0后,无运行版本
3.5.2 Confirmed
当烧录至slot 0(0x40000/secondary image)的程序为confirm程序,烧录至slot 1(0x50000/secondary image)的程序为confirm程序时
最终reset通过版本判断,会通过bootloader程序跳转到不同的partition,运行较高版本固件
4 总结说明
以上为目前所有可以支持的升级方式说明,通过hello_world sample进行演示:
带scratch区的有助于理解搬运过程,但后续由于空间限制不一定采用。
不带scratch区的升级主要先以目前method1 带搬运的升级作为主要验证方式,后续在1024KB上只需要替换适配board.dts文件,即可对其他sample(flash占用较大的程序)进行支持。
不搬运的方式同样可以在项目中考虑,如method4,method5,不搬运的方式对flash使用具有一定好处,但对编译烧录方式有一定限制如上文述。