Zephyr Bootloader 开发指南
本文介绍 zephyr bootloader 基本功能、使用方法、Flash 区域划分,以及 Image 生成与签名等内容。
Zephyr 支持一个名为 mcuboot 的开源 Bootloader 框架, 其工程源码位置:
MCUBoot for Zephyr:
01_SDK\bootloader/mcuboot/boot/zephyr
本文主要将分三部分介绍 Zephyr Bootloader 相关内容:
功能说明:介绍 mcuboot 的基本功能及 Flash 区域划分等内容
Image 与编译说明:介绍 SDK 中 Image 签名方法,如何烧录默认的 mcuboot image,以及如何编译自己的 mcuboot image 等内容
内嵌串口升级与 2.4G OTA 升级:介绍 SDK 内嵌了2个固件升级的features
1 功能说明
mcuboot 为 Zephyr 官方推荐并支持的 bootloader,其本身支持多个平台(包括 zephyr/mynewt 等),mcuboot 可为 Zephyr 提供 Image 签名验证、搬运升级、信息标记等能力。
参考官方连接:
zephyr 中关于 mcuboot 升级功能介绍:
mcuboot 官方文档介绍:
mcuboot 关于 zephyr 应用介绍:
1.1 Flash 区域划分
目前 SDK 中各 EVB 板默认的 Flash 区域划分如下:
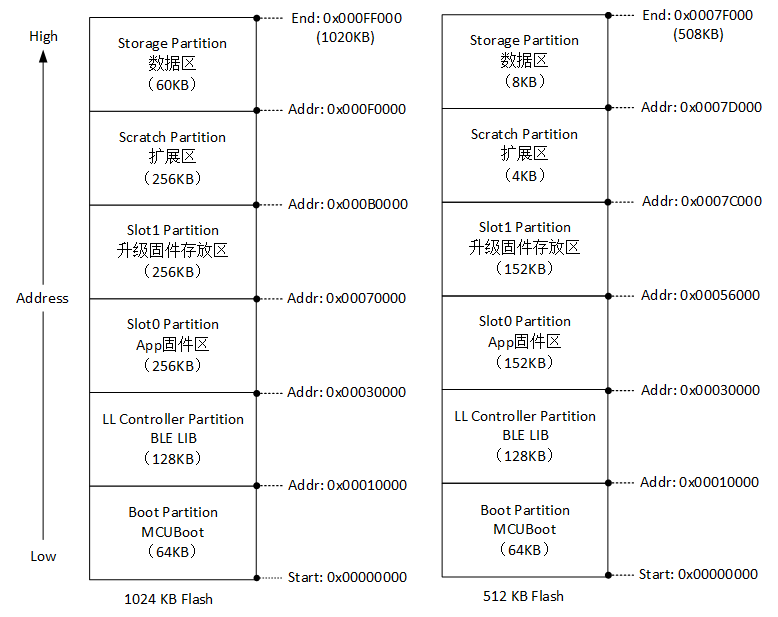
Zephyr Flash 区域划分
Boot Partition:用于存放 MCUBoot Image
LL Controller Partition:用于存放 BLE LL Controller Image
Slot0 Partition:用于存放用户 Zephyr Image(OS+APP+BLE HOST)
Slot1 Partition:DFU / OTA 的时候用于临时存放从远端接收的 LL Controller 或 App Image,供 Bootloader 在启动的时候(搬移)使用。
Scratch Partition:临时存放固件的交换区域(可选)
Storage Partition:存放 Zephyr App Data(NVS / Settings)的区域
注1:各 EVB Board 的 FLash 区域划分具体地址及大小,请参考各自 board 目录下的 dts 文件,如
01_SDK\zephyr\boards\arm\pan108xxb5_evb\pan108xxb5_evb.dts对应1024K(实际1020K可用) Flash的Board/* pan108xxb5_evb.dts */ ... &flash0 { partitions { compatible = "fixed-partitions"; #address-cells = <1>; #size-cells = <1>; boot_partition: partition@0 { label = "mcuboot"; reg = <0x00000000 0x00010000>; read-only; }; llctlr_partition: partition@10000 { label = "llcontroller"; reg = <0x00010000 0x00020000>; }; slot0_partition: partition@30000 { label = "image-0"; reg = <0x00030000 0x00040000>; }; slot1_partition: partition@70000 { label = "image-1"; reg = <0x00070000 0x00040000>; }; scratch_partition: partition@D0000 { label = "image-scratch"; reg = <0x000D0000 0x00020000>; }; storage_partition: partition@f0000 { label = "storage"; reg = < 0xf0000 0xF000 >; }; }; };
01_SDK\zephyr\boards\arm\pan108xxa3_evb\pan108xxa3_evb.dts对应512K(实际508K可用) Flash的Board/* pan108xxa3_evb.dts */ ... &flash0 { partitions { compatible = "fixed-partitions"; #address-cells = <1>; #size-cells = <1>; boot_partition: partition@0 { label = "mcuboot"; reg = <0x00000000 0x00010000>; read-only; }; llctlr_partition: partition@10000 { label = "llcontroller"; reg = <0x00010000 0x00020000>; }; slot0_partition: partition@30000 { label = "image-0"; reg = <0x00030000 0x00026000>; }; slot1_partition: partition@56000 { label = "image-1"; reg = <0x00056000 0x00026000>; }; scratch_partition: partition@7C000 { label = "image-scratch"; reg = <0x0007C000 0x00001000>; }; storage_partition: partition@7D000 { label = "storage"; reg = <0x0007D000 0x00002000>; }; }; };注2:实际项目中,除 Boot Partition 和 LL Controller Partition 外,其他分区的起始地址和大小均可根据实际情况进行修改(注意需要重新编译 MCUBoot,方法请参考 2.3 小节的介绍)
注3:对于 PAN108X SoC 来说,1MB 的 Flash,用户实际可用的区域为 1020 KB;512 KB 的 Flash,用户实际可用的区域为 508 KB。这是因为 PAN108x SoC 保留了 4KB 的 Flash 空间(称为 INFO Area),用于存放一些特殊的数据(无法存放代码)。
1.2 Image 格式
在使能 Bootloader 后,App Image 起始的 512 Bytes 被配置为 Image Header,用于存放固件版本、固件大小等信息。
当使用签名工具对 App Image 进行签名后:
Image Header 中会被填入 Magic、Version、Load Address、Image Size 等信息
Image 尾部会被增量写入 Hash、签名等信息,用于 Image 的完整性和合法性校验。
1.2.1 Image Header
大小:512 Bytes = 0x200
位置:Image 文件头部
作用:存放固件版本固件大小等信息,
ih_load_addr用做将固件搬运至的区域信息(slot0_partition/llctlr_partition)格式:
struct image_version {
    uint8_t iv_major;
    uint8_t iv_minor;
    uint16_t iv_revision;
    uint32_t iv_build_num;
};

/** Image header.  All fields are in little endian byte order. */
struct image_header {
    uint32_t ih_magic;
    uint32_t ih_load_addr;
    uint16_t ih_hdr_size;           /* Size of image header (bytes). */
    uint16_t ih_protect_tlv_size;   /* Size of protected TLV area (bytes). */
    uint32_t ih_img_size;           /* Does not include header. */
    uint32_t ih_flags;              /* IMAGE_F_[...]. */
    struct image_version ih_ver;
    uint32_t _pad1;
};
1.2.2 Image TLV
位置:Image 文件尾部
大小:根据尾部信息可以检索出4字节
tlv_header,其中包含it_tlv_tot为TLV区域总大小作用:存放 hash 值及签名信息
格式:
Image TLV 位于 Image 尾部
前 4 字节为
tlv_header接下来 4 字节为
it_type+it_len之后跟随
it_len长度的it_type类型信息以当前 tlv 格式来说,具有 3 种
it_type,依次为:IMAGE_TLV_SHA256(hash检查)IMAGE_TLV_KEYHASH(key)IMAGE_TLV_RSA2048_PSS(签名验证)
/*

 * ECSDA224 is with NIST P-224
 * ECSDA256 is with NIST P-256
   */

/*

 * Image trailer TLV types.
   *
 * Signature is generated by computing signature over the image hash.
 * Currently the only image hash type is SHA256.
   *
 * Signature comes in the form of 2 TLVs.
 * 1st on identifies the public key which should be used to verify it.
 * 2nd one is the actual signature.
    */
   #define IMAGE_TLV_KEYHASH           0x01   /* hash of the public key */
   #define IMAGE_TLV_PUBKEY            0x02   /* public key */
   #define IMAGE_TLV_SHA256            0x10   /* SHA256 of image hdr and body */
   #define IMAGE_TLV_RSA2048_PSS       0x20   /* RSA2048 of hash output */
   #define IMAGE_TLV_ECDSA224          0x21   /* ECDSA of hash output */
   #define IMAGE_TLV_ECDSA256          0x22   /* ECDSA of hash output */
   #define IMAGE_TLV_RSA3072_PSS       0x23   /* RSA3072 of hash output */
   #define IMAGE_TLV_ED25519           0x24   /* ed25519 of hash output */
   #define IMAGE_TLV_ENC_RSA2048       0x30   /* Key encrypted with RSA-OAEP-2048 */
   #define IMAGE_TLV_ENC_KW            0x31   /* Key encrypted with AES-KW 128 or 256*/
   #define IMAGE_TLV_ENC_EC256         0x32   /* Key encrypted with ECIES-EC256 */
   #define IMAGE_TLV_ENC_X25519        0x33   /* Key encrypted with ECIES-X25519 */
   #define IMAGE_TLV_DEPENDENCY        0x40   /* Image depends on other image */
   #define IMAGE_TLV_SEC_CNT           0x50   /* security counter */
   #define IMAGE_TLV_BOOT_RECORD       0x60   /* measured boot record */
  				   /*
  				    * vendor reserved TLVs at xxA0-xxFF,
  				    * where xx denotes the upper byte
  				    * range.  Examples:
  				    * 0x00a0 - 0x00ff
  				    * 0x01a0 - 0x01ff
  				    * 0x02a0 - 0x02ff
  				    * ...
  				    * 0xffa0 - 0xfffe
  				    */
   #define IMAGE_TLV_ANY               0xffff /* Used to iterate over all TLV */

/** Image TLV header.  All fields in little endian. */
struct image_tlv_info {
    uint16_t it_magic;
    uint16_t it_tlv_tot;  /* size of TLV area (including tlv_info header) */
};

/** Image trailer TLV format. All fields in little endian. */
struct image_tlv {
    uint16_t it_type;   /* IMAGE_TLV_[...]. */
    uint16_t it_len;    /* Data length (not including TLV header). */
};
1.3 imgtool
imgtool 是 mcuboot 提供的给 Image 签名的工具,其源码位于bootloader\mcuboot\scripts 目录下。
当我们想给 Image 签名的时候,需执行如下形式的指令:
python bootloader\mcuboot\scripts\imgtool.py sign --key bootloader\mcuboot\root-rsa-2048.pem --header-size 0x200 --align 8 --version 1.x --slot-size 0x10000 --pad --confirm build\hello_world_prj_pan108xxb5_evb\zephyr\zephyr.bin build\hello_world_prj_pan108xxb5_evb\zephyr\signed1.x.bin
各参数含义如下:
–key :签名 key 信息,需要与 Bootloader config 宏所对应的解签方式对应
CONFIG_BOOT_SIGNATURE_TYPE_RSA–header-size :header 大小固定 0x200 (Bytes)
–align :8
–version :version 版本1.x
–slot-size 0x10000:image tailer 存放末尾位置
–pad:为 image 添加 tailer,升级固件所必须的 pad magic 的添加命令
–confirm:为 image tailer 添加 confirm 信息,存在则升级方式为 permanent,否则为 test 方式
后接原始文件路径及生成固件路径
注:在编译 App Image 的时候,编译系统会自动调用此工具给编译生成的 Image 进行签名(签名后的 Image 会带有
*.signed.hex/bin形式的后缀),此处仅做了解即可。
1.4 升级方式
目前 SDK 中默认提供的 MCUBoot Image,被配置为 Boot Upgrade Only 的方式,即在芯片启动后,Bootloader 首先检查 Slot1 Partition 中是否存在有效的待升级 Image,如果有,则根据Image Header 中包含的地址信息,直接将其搬运到 Slot0 Partition 或 LL Controller Partition,搬运结束后,会将Slot1 Partition区域擦除。
对应的 MCUBoot Kconfig 定义:
config BOOT_UPGRADE_ONLY
	bool "Overwrite image updates instead of swapping"
	help
	  If y, overwrite the primary slot with the upgrade image instead
	  of swapping them. This prevents the fallback recovery, but
	  uses a much simpler code path.
2 Image 与编译说明
PAN108x SDK 从 v0.6.0 版本开始,默认使能了 Bootloader(即CONFIG_MCUBOOT=y)。
2.1 App Images 生成与签名
当 App 程序编译成功后,编译系统会自动对生成的 Image 进行签名(用于 DFU/OTA 固件升级)与合并(用于 SWD 方式烧录)等操作。例如,一个典型的 蓝牙 App 工程,会生成如下这些 Images:
mcuboot.bin:二进制格式的 Bootloader Imagemcuboot.hex:十六进制文本格式的 Bootloader Imagellcontroller.bin:二进制格式 BLE LL Controller Imagellcontroller.hex:十六进制文本格式 BLE LL Controller Imagellcontroller.signed.bin:签名后的二进制格式的 BLE LL Controller Image,可用于 DFU/OTAllcontroller.signed.hex:签名后的十六进制文本格式的 BLE LL Controller Imagezephyr.elf:编译输出的带调试信息的 App Imagezephyr.bin:编译输出的二进制格式 App Imagezephyr.hex:编译输出的十六进制文本格式 App Imagezephyr.signed.bin:签名后的二进制格式的 App Image,可用于 DFU/OTAzephyr.signed.hex:签名后的十六进制文本格式的 App ImagezImageMerged.bin:合并了 Bootloader 和 签名后 App、BLE LL Controller 等 Image 的二进制格式 Image,用于 SWD 方式烧录zImageMerged.hex:合并了 Bootloader 和 签名后 App、BLE LL Controller 等 Image 的十六进制文本格式 Image,用于 SWD 方式烧录
注1:上述 Images 中,
mcuboot.bin/hex与llcontroller.bin/hex是 SDK 提供的预编译好的固件,它们原始文件分别位于以下两个目录:
mcuboot:01_SDK\modules\hal\panchip\panplat\pan1080\bootloader\images
llcontroller:01_SDK\modules\hal\panchip\panplat\pan1080\ble\images
注2:
llcontroller.signed.bin/hex是 App 编译过程中,对llcontroller.bin/hex进行签名后的 Image,其:
使用与 App Image 相同的签名密钥(RSA Key)(均由
CONFIG_MCUBOOT_SIGNATURE_KEY_FILE配置指定)使用 Panchip 内部维护的版本号(Image Verison)进行签名(即无法由 App 的
CONFIG_MCUBOOT_EXTRA_IMGTOOL_ARGS配置指定)注3:
zephyr.bin/hex/elf是 App 编译的原始输出文件,其中的 elf 文件可用于调试,而 bin/hex 文件则无法直接烧录使用。注4:
zephyr.signed.bin/hex是 App 编译过程中,对zephyr.bin/hex进行签名后的 Image,其:
签名密钥(RSA Key)由
CONFIG_MCUBOOT_SIGNATURE_KEY_FILE配置指定版本号(Image Verison)由
CONFIG_MCUBOOT_EXTRA_IMGTOOL_ARGS配置指定,例如,我们希望将 App 版本号签名为v1.2.3,则应指定如下的形式的参数:CONFIG_MCUBOOT_EXTRA_IMGTOOL_ARGS="--version 1.2.3"注5:
zImageMerged.bin/hex是合并后的 Image,可以方便使用 ZAL / VS Code / JFlash 等工具进行 Image 烧录。
2.2 SDK 提供的默认 MCUBoot Image
上一小节有提到,SDK 中默认提供了一些预编译好的 MCUBoot Image,其位于 01_SDK\modules\hal\panchip\panplat\pan1080\bootloader\images 目录下。此目录下目前有 4 个 Images,分别用于不同的场景:
mcuboot_pan108xxa1.hex:512KB Flash 的 SoC,在未开启 DCDC(即未使能CONFIG_SOC_DCDC_PAN1080)时会默认使用此 Imagemcuboot_pan108xxb1.hex:1MB Flash 的 SoC,在未开启 DCDC(即未使能CONFIG_SOC_DCDC_PAN1080)时会默认使用此 Image
2.3 重新编译 MCUBoot Image
当有修改 Flash Partition、修改签名密钥(RSA Key)、调试 MCUBoot 等需求时,我们需要重新编译 mcuboot:
使用 ZAL 工具选择正确的 Board,然后在 Project List 中选择
bootloader\mcuboot\samples\zephyr(位于列表末尾),并根据需求选择 Config,编译后可以直接运行下载进行烧录;需要注意此方式为临时烧录 Bootloader 的方式,如果后续重新烧录了 App 工程中的zImageMerged.hex/bin文件,则新修改的 MCUBoot Image 会被覆盖。若希望后续编译 App 的时候一直使用新的 MCUBoot Image,则在编译完 MCUBoot Image 后,需要从其 build 目录下拷贝
mcuboot*.hex文件,手动替换掉modules\hal\panchip\panplat\pan1080\bootloader\images目录下替换掉已有的 MCUBoot Image。注:也可以自行修改
modules\hal\panchip\panplat\pan1080\bootloader目录下的 CMakeLists.txt 文件,强制使用新的 MCUBoot Image。
3 Watchdog说明
PAN108x SDK 从 v1.0.0 版本开始,默认在bootloader中使能了Watchdog(即CONFIG_BOOT_WATCHDOG_OPEN=y)。
Watchdog设置默认时钟源为32K RCL,复位时间设置为最大2^18个32K时钟周期(约9.192s)。
App中设置对应的config(即CONFIG_BOOT_WATCHDOG_DISABLE=y),默认关闭Watchdog功能,如需使用Watchdog功能在app对应的prj文件中设置CONFIG_BOOT_WATCHDOG_DISABLE=n即可,设置完成后系统将默认在idle线程中进行喂狗操作。
4 Lvr说明
PAN108x SDK 从 v1.0.0 版本开始,默认在bootloader中使能了Lvr功能(即CONFIG_BOOT_LVR_OPEN=y)。
Lvr功能的作用是当Soc供电电压低于阈值(小于1.8V)时触发复位,PAN108x Soc的供电范围为1.8~3.6V,当电压低于1.8V时,Soc的程序运行会出错,根据Lvr特性,当Soc电压抖动时可触发其复位保证Soc的程序正常运行。
App中设置对应的config(即CONFIG_BOOT_LVR_DISABLE=y),默认关闭Lvr功能,如需使用Lvr功能在app对应的prj文件中设置CONFIG_BOOT_LVR_DISABLE=n即可。