BLE Mesh 开发指南
1 Mesh Introduce
PAN1080基于zephyr,验证并开发了Mesh大部分feature和model, 并兼容了PAN1080方案内的部分功能
1.1 区域划分
Mesh可以选择带Boot程序的烧录方式,支持OTA功能,config宏需要配置
CONFIG_IS_BOOTLOADER=y
CONFIG_USE_DT_CODE_PARTITION=n
也可以选择不带Boot程序的烧录方式,config宏需要配置
CONFIG_IS_BOOTLOADER=n
CONFIG_USE_DT_CODE_PARTITION=y
当使能带Boot程序的烧录方式时,zephyr区域划分如下
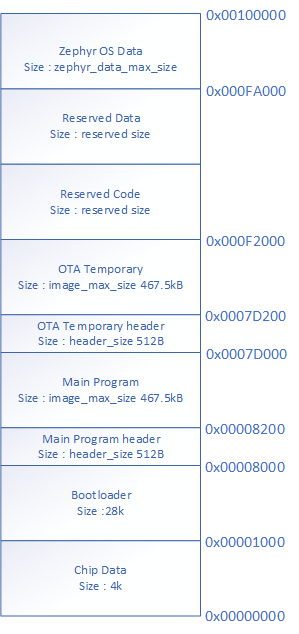
Zephyr Flash 区域划分
Chip Data区:
4K 受保护的出厂info区;
存放不同项目定制的OTA区域划分,关键参数
OTA_header_addr , OTA_header_size
OTA header文件存储位置和大小
OTA_image_addr ,image_max_size
OTA image文件起始位置,image最大大小
zephyr_data_start_addr,zephyr_data_max_size
Zephyr系统存储数据区起始位置和大小
Bootloader区:
28K 出厂烧录,通常不会进行更新的boot程序,包含搬运程序(最大4k)及兼容后续开发上位机通信升级程序(最大24K)
Main Program header区:
大小 512B
存放备用信息,便于扩展B方案
Main Program区:
大小根据项目不同 = image_max_size;
bootloader跳转的实际程序区
OTA temporary 区header:
大小:512B
存放固件对应信息,搬运时使用crc及size确认固件完整性,搬运后标志相应flag标识结束
OTA temporary 区:
分为 OTA header及 OTA image,合起来在固件传输时可以称为firmware
临时存放升级程序区,大小 = image_max_size
OTA image 内容同 Main Program;编译生成固件方式同Main Program(不需要特殊映射编译地址)
Reserved Code区
大小:zephyr_data_start_addr - (OTA_image_addr + OTA_image_max_size) ;
剩余空闲区域
Reserved Data区
存放用户数据区,预留大小为剩余部分
Zephyr OS Data区
存放系统数据区(CONFIG_FLASH区),使用zephyr config flash方式存储项目中的信息(如入网信息)
用户可以选择升级后擦除/保留该数据区内容
1.2 Provisioning
Mesh provisioning为Mesh 最主要的组网功能,未入网设备可以通过以下3种方式进行入网
入网通过Nrf Mesh App时,可以选择OOB入网方式进行
广义入网通常还包括入网后的 Config 过程,狭义正式的入网通常只包括到 Provision data 分配完成
1.2.1 Key说明
入网涉及到多种key,在抓包分析时起到比较重要的作用,以下对其进行介绍
1.2.1.1 Session Key
狭义入网过程并不需要key进行解析,但在入网过程中,涉及到ECDH中交换session key的过程,用来完成ECC加解密完成入网,可以参考 Mesh Spec进行简单了解
1.2.1.2 Network Key
在网络层加密认证消息。有了网络层的密钥就可以成为Mesh网络的一员,可以对数据进行加密、解密和转发。如果Mesh网络中有多个子网,每个子网都会用自己的Network Key,不同子网的设备是没有办法进行数据转发的
1.2.1.3 Device Key
Device Key是一种特殊的App Key,每个节点的Device Key都是独一无二的,它用在配网阶段,用于实现数据的安全传输。只有Provisioner和入网的设备知道这个Device Key
Foundation Model需要用dev key加密进行传输
1.2.1.4 App Key
在access层加密认证消息。虽然有Network Key可以实现数据的加解密和转发,但是网络层不知道应用层的数据具体是什么。要解决这个问题,就需要用到Application Key,简称App Key。在一个Mesh网络里,可能有多个App Key,每个App Key对应一组应用和相关的节点
1.2.1.5 Key通过Code获取
Key通过code开启相应的宏,可以打印出来供解析使用
netkey&devkey通过 入网是prov_data获取,通过开启
CONFIG_BT_DEBUG_LOG=y
CONFIG_BT_MESH_DEBUG=y
CONFIG_BT_MESH_DEBUG_PROV=y
在
subsys\bluetooth\mesh\prov_device.c中打印static void prov_data(const uint8_t *data) { ... /* Log of netkey & devkey */ uint8_t netkey[16]; memcpy(netkey, &pdu, 16); BT_DBG("NetKey: %s", bt_hex(netkey, 16)); BT_DBG("DevKey: %s", bt_hex(dev_key, 16)); ... }
appkey 在入网后config进行获取,通过开启config宏
CONFIG_BT_DEBUG_LOG=y
CONFIG_BT_MESH_DEBUG=y
CONFIG_BT_MESH_DEBUG_KEYS=y
在
app_keys.c中打印uint8_t bt_mesh_app_key_add(uint16_t app_idx, uint16_t net_idx, const uint8_t key[16]) { struct app_key *app; BT_DBG("net_idx 0x%04x app_idx %04x val %s", net_idx, app_idx, bt_hex(key, 16)); ... }
1.2.2 OOB方式入网说明
入网时,需要了解入网的验证方式,入网验证方式在provisioner 发送invite后,由设备将支持的oob方式在capabilities内体现,由provisioner发送 Start消息时继进行选择,有如下几种
oob配置方式为通常在mesh init prov结构体时选择支持方式如下
static const struct bt_mesh_prov prov = {

	...

	.output_size = 4,
	.output_actions = BT_MESH_DISPLAY_STRING,
	.output_string = prov_output_string,

	...

};
1.2.2.1 No OOB
PanMesh/Echo入网时,start内选择No OOB,不需要额外进行交互即可进行入网
1.2.2.2 Static OOB
天猫精灵/小度音箱通过三元组生成的Static OOB在云端请求验证方式进行入网,因此三元组在入网流程中是必要的
1.2.2.3 Input OOB
由provisioner show,由芯片端进行输入的方式进行入网oob交互验证
1.2.2.4 Output OOB
由芯片端 show,由provisioner 进行输入的方式进行入网oob交互验证
1.2.3 pb_adv 入网
pb_adv在项目内通过使能相应宏
CONFIG_BT_MESH_PB_ADV=y
并且code内开启pb_adv入网方式,通常code如下即可开启两种bearer的应用,而之上的Config决定最终生效的bearer
bt_mesh_prov_enable(BT_MESH_PROV_ADV | BT_MESH_PROV_GATT);
1.2.3.1 功能说明
设备入网是指将一个未入网的设备加入到Mesh网络的过程,这整个过程是由Provisioner管理的。Provisioner提供给未入网的设备一些入网数据(包括Network Key,当前的IV Index,元素的单播地址等)来使其成为一个入网的Mesh节点。Provisioner主要是智能手机或者一些智能设备,我们这里介绍的Provisioner主要指的是天猫精灵。
(1)建立入网bearer
要入网一个设备,Provisioner和设备之间要建立入网的bearer,Provisioner主要通过设备的Device UUID和其他信息来对设备进行识别。
(2)建立共享的密钥
Provisioner和设备使用ECDH协议建立一个共享的密钥。
(3)认证设备
然后使用指定的OOB信息(设备的public key等等)认证设备。
(4)传输加密的数据
传输加密(使用共享的密钥)的数据。
如图所示,展示的是我们Mesh入网的协议栈,GAP入网主要走的是红框标注的流程。
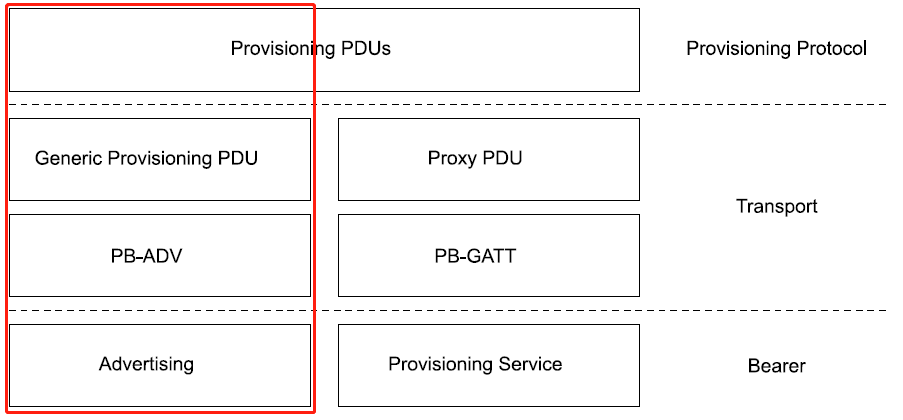
Mesh入网协议栈框图
Provisioner使用PB-ADV,通过广播的方式向未入网的设备发送Generic Provisioning PDU对设备进行入网。Provisioner一次可以对多个设备入网,但Provisionee一次只能被一个Provisioner入网。PB-ADV bearer被用来传输Generic Provisioning PDU,PB-ADV bearer MTU(最大传输单元)长度是24字节。
1.2.3.2 入网流程
GAP入网通常需要5个步骤来完成,分别是设备发现,入网邀请,交换公钥,认证和分配入网数据,关于GAP的详细入网流程可以参考下图。

GAP入网流程
(1)设备发现
设备(如PAN1080)在未入网且没有处在入网流程时,应该向外界广播未入网的Beacon数据包。Provisioner(如天猫精灵)在准备好对未入网设备入网时,一直处于扫描状态,扫描窗口接近100%,当扫描到未入网设备发的Beacon包之后,进行一些验证,完成设备发现操作。
(2)入网邀请
在建立了一个入网bearer之后,Provisioner应该向未入网的设备发送Provisioning Invite PDU,未入网的设备收到邀请后向Provisioner回复一个Provisioning Capabilities PDU。
(3)交换公钥
在收到设备的入网能力之后,一旦Provisioner决定对设备进行入网,它应该发送一个Provisioning Start PDU。紧接着Provisioner和设备之间交换公钥。
(4)认证
Provisioner和设备接着发送Provisioning Confirmation PDU给对方,来确认到目前为止接收到的值。然后Provisioner和设备互相发送Provisioning Random PDU来使对方的确认生效。
(5)分配入网数据
一旦设备被认证了,Provisioner和设备应该使用密钥加密入网的数据。Provisioner然后向设备发送Provisioning Data PDU(包含加密和认证的入网数据)给设备。发送完且设备接收配置完成之后,入网操作完成。
1.2.3.3 多音箱支持同时入网
Panchip为适配同一代码实现不同音箱根据不同三元组开发了兼容入网的功能
当客户有需求实现一个设备同时可以通过天猫精灵和小度入网时,使能兼容入网功能,
CONFIG_BT_MESH_MULTIPLE_BEACON=y
交替广播天猫精灵和小度广播使天猫精灵和小度都可以发现设备并入网
需要注意入网过程中会通过link ID选择不同的static OOB(三元组生成)
static void link_open(struct prov_rx *rx, struct net_buf_simple *buf)
{
	...
#if defined(CONFIG_BT_MESH_MULTIPLE_BEACON)

	if (!memcmp(buf->data, bt_mesh_prov_get()->uuid, 16)) {
		BT_DBG("Bearer open message for tmall");
		speaker_dev_type = SPEAKER_DEV_TMALL;
	} else if(!memcmp(buf->data, bt_mesh_prov_get()->uuid2, 16)) {
		BT_DBG("Bearer open message for xiaodu");
		speaker_dev_type = SPEAKER_DEV_XIAODU;
	} else {
		BT_DBG("Bearer open message not for us");
		return;
	}
#else
	if (memcmp(buf->data, bt_mesh_prov_get()->uuid, 16)) {
		BT_DBG("Bearer open message not for us");
		return;
	}
#endif
	...
}
1.2.3.4 pb_remote_adv入网
pb remote model server 对 unprovisionee node进行入网时,实际上是通过pb adv进行最后的入网消息通信,对于unprovisionee来说,支持pb adv入网的功能即可验证pb remote的功能
具体请参考Remote Model的介绍
1.2.4 pb_gatt 入网
pb_gatt在项目内通过使能相应宏
CONFIG_BT_MESH_PB_GATT=y
并且code内开启pb_gatt入网方式,通常code如下即可开启两种bearer的应用,而之上的Config决定最终生效的bearer
bt_mesh_prov_enable(BT_MESH_PROV_ADV | BT_MESH_PROV_GATT);
pb-gatt入网主要应用与手机入网及Echo入网,较pb adv入网,由于pb gatt是基于连接,入网会更稳定更快速
pb gatt入网连接建立需要参考 Mesh Profile,Mesh GATT Provisioning Services介绍
连接建立后消息network层消息同pb adv一致
入网后通常通过Network ID/Node ID进行重连config
入网后config阶段有些情况下需要proxy protocol内的configuration对proxy进行细节filtrting配置(如echo,每次重新连接gatt时需要增加白名单过滤)
1.2.5 开发说明
以兼容入网为例,ble_mesh.c中可以追溯prov结构体的APIs
static const struct bt_mesh_prov prov = {
	.uuid = dev_uuid_tmall,
	.output_size = 4,
	.output_actions = BT_MESH_DISPLAY_STRING,
	.static_val = m_auth_data_tmall,
	.static_val_len = 16,
	.complete = prov_complete,
	.reset = prov_reset,
	.output_string = prov_output_string,
#if defined(CONFIG_BT_MESH_MULTIPLE_BEACON)
	.uuid2 = dev_uuid_xiaodu,
	.static_val2 = m_auth_data_xiaodu,
#endif
};
pb bearer使能:
bt_mesh_prov_enable(BT_MESH_PROV_ADV | BT_MESH_PROV_GATT);
1.3 Features
Mesh Spec支持4种大的Feature,分别为proxy,relay,friend,low power
1.3.1 Proxy
1.3.1.1 功能说明
1.3.1.1.1 广播行为
入网以后,通过广播gatt广播包,内容为node id广播包,Provisioner可以通过扫描进行重连配置
配置之后,node id广播包存在周期60s后,切换为net id广播包
此时入网设备(如PanMesh)可以通过扫描netid广播包对proxy node进行重连
1.3.1.2 参数
1.3.1.2.1 使能
Proxy为mesh一大特色,通过使能节点的proxy功能
CONFIG_BT_MESH_GATT_PROXY=y
gatt client可以连接 gatt server,对整个mesh网络进行控制
1.3.1.2.2 配置连接参数
通常,节点作为proxy被连接时,遵守proxy client的连接参数
某些情况下,需要proxy server端主动更新连接参数以适应部分场景
作为gatt连接proxy节点时,需要代码内进行主动更新连接参数,code参考如下,此段逻辑可以完成proxy连接时,更新连接参数gatt interval 到100ms,并在connected 与 disconneted 时进行log打印。
static void connected(struct bt_conn *conn, uint8_t err)
{
	/* gatt interval adjust to 100 ms to improve scan */
	const struct bt_le_conn_param *param = BT_LE_CONN_PARAM(80, 80, 0, 500);

	bt_conn_le_param_update(conn, param);
	if (err) {
		printk("Connection failed (err 0x%02x)\n", err);
	} else {
		printk("Connected\n");
	}
}

static void disconnected(struct bt_conn *conn, uint8_t reason)
{
	printk("Disconnected (reason 0x%02x)\n", reason);
}

BT_CONN_CB_DEFINE(conn_callbacks) = {
	.connected = connected,
	.disconnected = disconnected,
};
1.3.1.2.3 Proxy配置参数
if BT_CONN

# Virtual option enabled whenever any Proxy protocol is needed
config BT_MESH_PROXY
	bool

config BT_MESH_GATT
	bool

config BT_MESH_GATT_SERVER
	bool
	select BT_MESH_GATT
	select BT_GATT_DYNAMIC_DB

config BT_MESH_PB_GATT
	bool "Provisioning support using GATT (PB-GATT)"
	select BT_MESH_GATT_SERVER
	select BT_MESH_PROV
	help
	  Enable this option to allow the device to be provisioned over
	  GATT.

config BT_MESH_GATT_PROXY
	bool "GATT Proxy Service support"
	select BT_MESH_GATT_SERVER
	select BT_MESH_PROXY
	help
	  This option enables support for the Mesh GATT Proxy Service,
	  i.e. the ability to act as a proxy between a Mesh GATT Client
	  and a Mesh network.

config BT_MESH_GATT_PROXY_ENABLED
	bool "GATT Proxy enabled"
	depends on BT_MESH_GATT_PROXY
	default y
	help
	  Controls whether the GATT Proxy feature is enabled by default.
	  Can be changed through runtime configuration.

config BT_MESH_NODE_ID_TIMEOUT
	int "Node Identity advertising timeout"
	depends on BT_MESH_GATT_PROXY
	range 1 60
	default 60
	help
	  This option determines for how long the local node advertises
	  using Node Identity. The given value is in seconds. The
	  specification limits this to 60 seconds, and implies that to
	  be the appropriate value as well, so just leaving this as the
	  default is the safest option.

config BT_MESH_PROXY_USE_DEVICE_NAME
	bool "Include Bluetooth device name in scan response"
	depends on BT_MESH_GATT_PROXY
	help
	  This option includes GAP device name in scan response when
	  the GATT Proxy feature is enabled.

config BT_MESH_PROXY_FILTER_SIZE
	int "Maximum number of filter entries per Proxy Client"
	default 3 if BT_MESH_GATT_PROXY
	default 1
	range 1 32767
	depends on BT_MESH_GATT_SERVER
	help
	  This option specifies how many Proxy Filter entries the local
	  node supports.

endif # BT_CONN
1.3.2 Relay
1.3.2.1 功能说明
Relay为network层的一种消息转发机制
1.3.2.2 参数
1.3.2.2.2 配置参数
menuconfig BT_MESH_RELAY
	bool "Relay support"
	help
	  Support for acting as a Mesh Relay Node.

if BT_MESH_RELAY

config BT_MESH_RELAY_ENABLED
	bool "Relay enabled"
	default y
	help
	  Controls whether the Mesh Relay feature is enabled by default. Can be
	  changed through runtime configuration.

config BT_MESH_RELAY_RETRANSMIT_COUNT
	int "Relay Retransmit Count"
	default 2
	range 0 7
	help
	  Controls the initial number of retransmissions of relayed messages, in
	  addition to the first transmission. Can be changed through runtime
	  configuration.

config BT_MESH_RELAY_RETRANSMIT_INTERVAL
	int "Relay Retransmit Interval"
	default 20
	range 10 330
	help
	  Controls the initial interval between retransmissions of relayed
	  messages, in milliseconds. Can be changed through runtime
	  configuration.

endif
1.3.3 Friend
1.3.3.1 功能说明
Mesh friend功能主要是为了低功耗设备准备的一个解决方案,这让那些低功耗的设备一方面保持低电流消耗的睡眠模式,另一方面又能收到和自己相关的Mesh数据包。为了完成上述的目的,SIG Mesh 规定了2种角色分别是Low Power node 和Friend node。
Zephyr Friend LPN 基础Feature分为两部分

Zephyr Friend LPN 基本交互图
第一部分 建立连接
1)LPN 发送 request,广播范围内寻找Friend,
2)收到消息的Friend会在delay后开始发送friend offer
3)LPN 收到offer会进行friend poll,等待 friend update
4)Friend收到 Poll消息后回复Friend update,确认建立连接
5)LPN收到消息,确认建立连接,进入第二部分
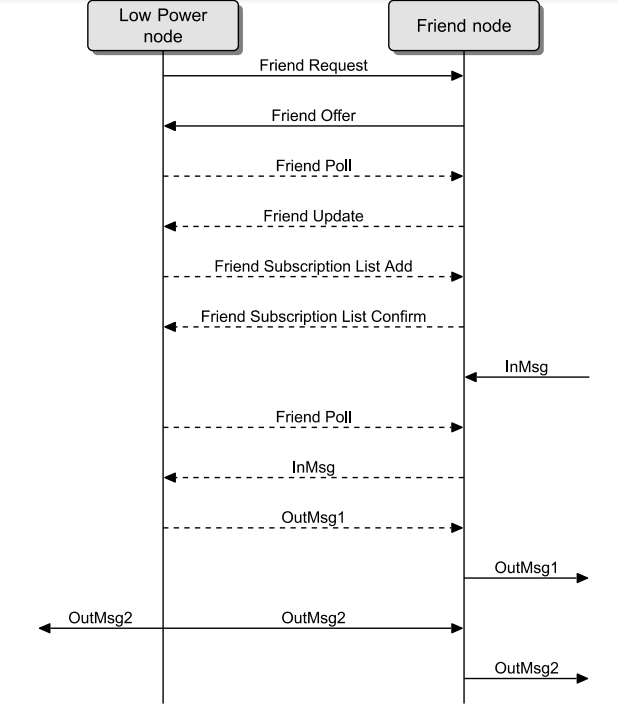
LPN与Friend node交互图
第二部分 Friend保持
1)LPN周期30s,发送Friend Poll,并定时开窗等待Friend Update
2)Friend 收到Friend Poll,check friend是否有存储LPN的消息,若有:通过Friend update进行传递,若无:通过Friend Update进行保持
3)重复以上过程
1.3.3.2 参数
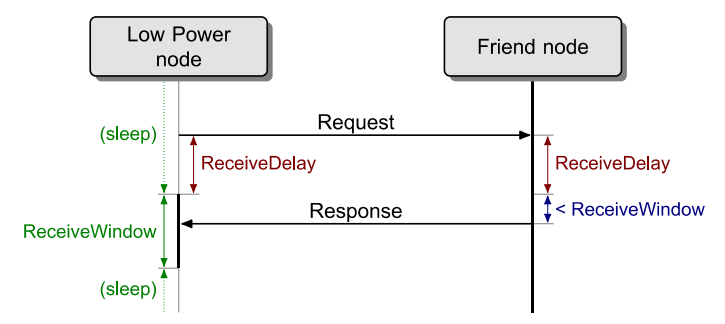
Friend关键参数如下图所示,receive window和receive delay对friend的建立和维持起到关键作用
Friend参数
1.3.3.2.1 使能
Friend为友好节点,可以通过消息于LPN建立Friend ship,周期性为LPN进行消息传递,通过使能sample内friend功能使能
CONFIG_BT_MESH_FRIEND=y
1.3.3.2.2 配置参数
config BT_MESH_FRIEND
	bool "Support for acting as a Friend Node"
	help
	  Enable this option to be able to act as a Friend Node.

if BT_MESH_FRIEND

config BT_MESH_FRIEND_ENABLED
	bool "Friend feature enabled"
	default y
	help
	  Controls whether the Friend feature is enabled by default. Can be
	  changed through runtime configuration.

config BT_MESH_FRIEND_RECV_WIN
	int "Friend Receive Window"
	range 1 255
	default 255
	help
	  Receive Window in milliseconds supported by the Friend node.

config BT_MESH_FRIEND_QUEUE_SIZE
	int "Minimum number of buffers supported per Friend Queue"
	range 2 65536
	default 16
	help
	  Minimum number of buffers available to be stored for each
	  local Friend Queue.

config BT_MESH_FRIEND_SUB_LIST_SIZE
	int "Friend Subscription List Size"
	range 0 1023
	default 3
	help
	  Size of the Subscription List that can be supported by a
	  Friend node for a Low Power node.

config BT_MESH_FRIEND_LPN_COUNT
	int "Number of supported LPN nodes"
	range 1 1000
	default 2
	help
	  Number of Low Power Nodes the Friend can have a Friendship
	  with simultaneously.

config BT_MESH_FRIEND_SEG_RX
	int "Number of incomplete segment lists per LPN"
	range 1 1000
	default 1
	help
	  Number of incomplete segment lists that we track for each LPN
	  that we are Friends for. In other words, this determines how
	  many elements we can simultaneously be receiving segmented
	  messages from when the messages are going into the Friend queue.

endif # BT_MESH_FRIEND
1.3.4 LPN
1.3.4.1 功能说明
Low Power Node为低功耗节点,与Friend建立Friendship,周期性唤醒获取消息更新
1.3.4.2 参数
1.3.4.2.2 配置
config BT_MESH_LOW_POWER
	bool "Support for Low Power features"
	help
	  Enable this option to be able to act as a Low Power Node.

if BT_MESH_LOW_POWER

config BT_MESH_LPN_ESTABLISHMENT
	bool "Perform Friendship establishment using low power"
	default y
	help
	  Perform the Friendship establishment using low power, with
	  the help of a reduced scan duty cycle. The downside of this
	  is that the node may miss out on messages intended for it
	  until it has successfully set up Friendship with a Friend
	  node.

config BT_MESH_LPN_AUTO
	bool "Automatically start looking for Friend nodes once provisioned"
	default y
	help
	  Automatically enable LPN functionality once provisioned and start
	  looking for Friend nodes. If this option is disabled LPN mode
	  needs to be manually enabled by calling bt_mesh_lpn_set(true).

config BT_MESH_LPN_AUTO_TIMEOUT
	int "Time from last received message before going to LPN mode"
	default 15
	range 0 3600
	depends on BT_MESH_LPN_AUTO
	help
	  Time in seconds from the last received message, that the node
	  will wait before starting to look for Friend nodes.

config BT_MESH_LPN_RETRY_TIMEOUT
	int "Retry timeout for Friend requests"
	default 8
	range 1 3600
	help
	  Time in seconds between Friend Requests, if a previous Friend
	  Request did not receive any acceptable Friend Offers.

config BT_MESH_LPN_RSSI_FACTOR
	int "RSSIFactor, used in the Friend Offer Delay calculation"
	range 0 3
	default 0
	help
	  The contribution of the RSSI measured by the Friend node used
	  in Friend Offer Delay calculations. 0 = 1, 1 = 1.5, 2 = 2, 3 = 2.5.

config BT_MESH_LPN_RECV_WIN_FACTOR
	int "ReceiveWindowFactor, used in the Friend Offer Delay calculation"
	range 0 3
	default 0
	help
	  The contribution of the supported Receive Window used in
	  Friend Offer Delay calculations. 0 = 1, 1 = 1.5, 2 = 2, 3 = 2.5.

config BT_MESH_LPN_MIN_QUEUE_SIZE
	int "Minimum size of acceptable friend queue (MinQueueSizeLog)"
	range 1 7
	default 1
	help
	  The MinQueueSizeLog field is defined as log_2(N), where N is
	  the minimum number of maximum size Lower Transport PDUs that
	  the Friend node can store in its Friend Queue. As an example,
	  MinQueueSizeLog value 1 gives N = 2, and value 7 gives N = 128.

config BT_MESH_LPN_RECV_DELAY
	int "Receive delay requested by the local node"
	range 10 255
	default 100
	help
	  The ReceiveDelay is the time between the Low Power node
	  sending a request and listening for a response. This delay
	  allows the Friend node time to prepare the response. The value
	  is in units of milliseconds.

config BT_MESH_LPN_POLL_TIMEOUT
	int "The value of the PollTimeout timer"
	range 10 244735
	default 300
	help
	  PollTimeout timer is used to measure time between two
	  consecutive requests sent by the Low Power node. If no
	  requests are received by the Friend node before the
	  PollTimeout timer expires, then the friendship is considered
	  terminated. The value is in units of 100 milliseconds, so e.g.
	  a value of 300 means 30 seconds.

config BT_MESH_LPN_INIT_POLL_TIMEOUT
	int "The starting value of the PollTimeout timer"
	range 10 BT_MESH_LPN_POLL_TIMEOUT
	default BT_MESH_LPN_POLL_TIMEOUT
	help
	  The initial value of the PollTimeout timer when Friendship
	  gets established for the first time. After this the timeout
	  will gradually grow toward the actual PollTimeout, doubling
	  in value for each iteration. The value is in units of 100
	  milliseconds, so e.g. a value of 300 means 30 seconds.

config BT_MESH_LPN_SCAN_LATENCY
	int "Latency for enabling scanning"
	range 0 50
	default 10
	help
	  Latency in milliseconds that it takes to enable scanning. This
	  is in practice how much time in advance before the Receive Window
	  that scanning is requested to be enabled.

config BT_MESH_LPN_GROUPS
	int "Number of groups the LPN can subscribe to"
	range 0 16384
	default 8
	help
	  Maximum number of groups that the LPN can subscribe to.

config BT_MESH_LPN_SUB_ALL_NODES_ADDR
	bool "Automatically subscribe all nodes address"
	help
	  Automatically subscribe all nodes address when friendship
	  established.

endif # BT_MESH_LOW_POWER
1.4 Models
1.4.1 Light Mdels
Light Models为Panchip为多种灯控整理的控制models,都是基于SIG Models的实现
1.4.2 Sig OTA Model
基于Sig Mesh V1.1,Mesh OTA通过
(1)BLOB transfer Model
(2)Device Firmware Update Model
(2)Distribute Model
实现升级数据的传送和整体升级流程的控制,从而达到为某些特定节点实现无线升级的功能。
Mesh OTA身份简介如下图,具体细节请参考SIG Mesh官方文档。
SIG OTA框图
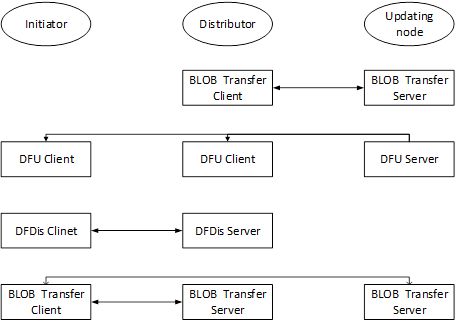
1.4.2.1 Panchip Mesh OTA介绍
基于如上考虑,Panchip Mesh需要实现Updating Node身份,如下图PanChip Server所示,对应的Model为BLOB Transfer Server及DFU Server。
Distributor为固件存储端及分发控制端,一般由对应厂商实现(如亚马逊),为方便调试,Panchip Client可以简要实现其BLOB Transfer Clinet所实现的数据分发过程。因而固件需要提前准备好在PanChip Clinet端,根据PAN1080 Mesh区域划分规则,目前策略为将80k-160k区域烧录待升级固件。
Initiator为升级控制端,一般由对应厂商实现(如亚马逊),为方便调试,Panchip芯片可以简要实现其DFU Client对应的控制流程(检查升级状态,固件版本,流程开始、结束,新固件应用),PanMesh Ios App需要从PanMesh下载链接进行下载。
综上考虑,Panchip提供完整的Updating Node角色实现及可供调试的对端身份如下图:

OTA Idendity
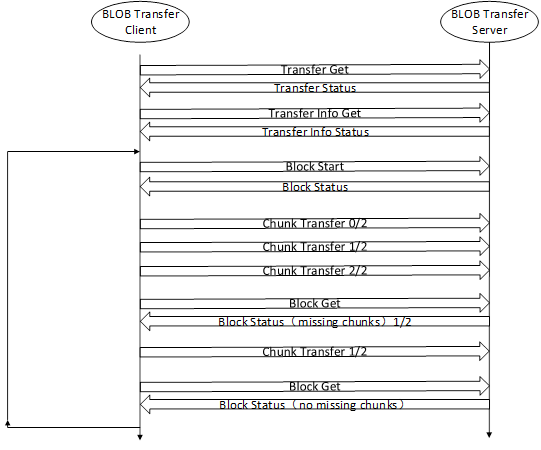
DFU实现消息概述如下图:
DFU Message
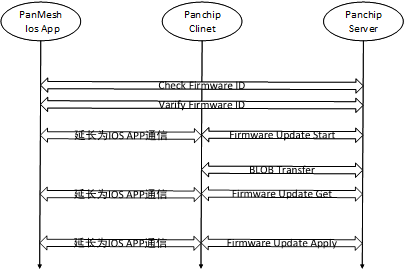
1.4.2.3 GATT SIG OTA操作流程
在工程目录下,将
ota.py拷贝至编译路径下,并运行,会由zephyer.bin生成zephyer_ota.bin,参考OTA Firmware章节描述,生成了header将
zephyer_ota.bin拷贝至IOS手机端PanMesh待带升级节点入网,并绑定appkey到SIG OTA Model
进入
Vendor Message界面,点击choose选择待升级固件点击
OTA start开始GATT SIG OTA升级(当前gatt为分段包升级,chunk 64B,Block Size 512B)升级完成
1.4.3 PB Remote Model
1.4.3.1 PB Remote Model 功能
PbRemote Model为sig model的一种,目的为实现通过PbRemote Model实现远程对provisionee进行入网。
目前手机端开发了简易的PbRemote Client,与远端芯片端的PbRemote Server建立Gatt连接后,实现scan/link/pdu通信,PbRemote Server收到scan消息进行report并开始进行扫描,扫描后通过scan report消息上报扫描到待入网设备UUID,手机端通过选择UUID进行建立连接,与指定设备进行连接后,手机端开始分发入网PDU执行入网,执行入网后,实现配置消息从而在手机端显示入网设备。
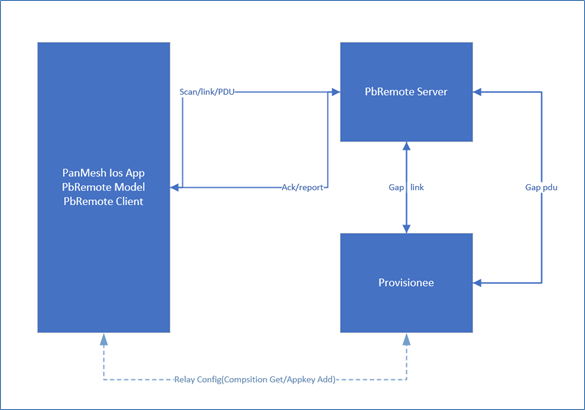
PB Remote
测试环境:由上图,需要准备
PanMesh Ios App:角色:PbRemote Client以及Provisioner
Chip#1:角色:PbRemote Server。烧录PbRemote Server代码完成与PbRemote Client通信并
处于入网消息转发的角色。
Chip#2:角色:Provisionee。待入网设备,烧录普通mesh待入网节点代码,支持Gap即可。
1.4.3.2 PB Remote 手机端操作流程
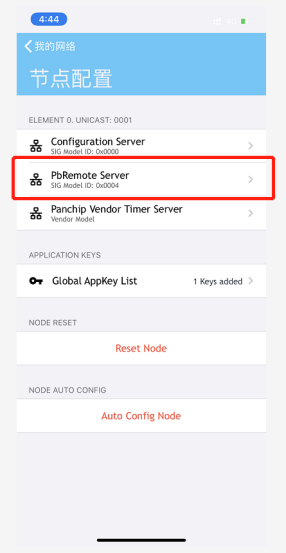
对包含PbRemote Server芯片入网设备后,界面显示PbRemote Server(Model ID 0x0004)(入网的时候可以不绑定Appkey,流程待优化)
Remote iOS 界面1
从Node Control界面进入Pb Remote界面

Remote iOS 界面2
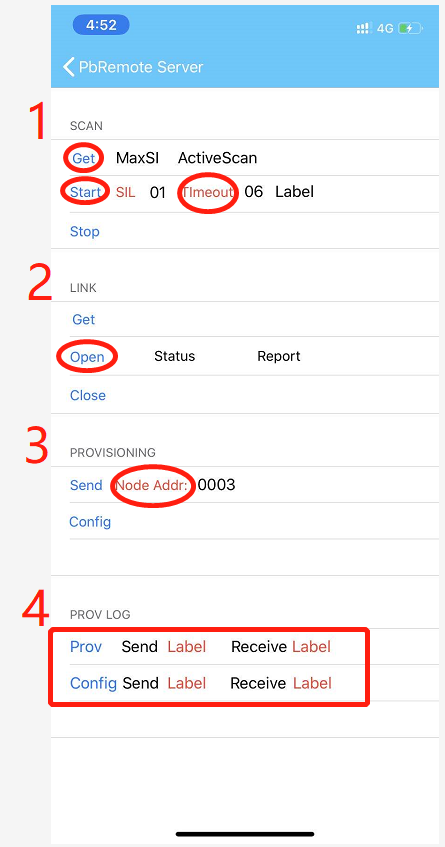
进入Server消息操作界面,消息包含Scan/Link/Provisioning PDU以及入网配置log显示。
Remote iOS 界面3
(1)点击Scan部分Get按键,获取Server的MaxSI(最大扫描设备个数)及ActiveScan(活跃扫描),获取结果如下。

Remote iOS 界面4
显示支持最多扫描4个设备并且不支持Active Scan
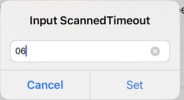
(2)点击SIL配置扫描待入网后上报节点UUID的最大个数(目前单个上报,此处默认01),以及扫描时间(默认06及扫描六秒)
Remote iOS 界面6
配置完成后,点击Start按键,Remote Server收到消息后开始扫描,时间结束进行上报,上报后在后面Label处显示devUUID Stored!如图。

Remote iOS 界面7
(3)点击Link部分Open按键,分别收到Link Status和Link Report消息后,后面的Label会变成红色表示建立连接成功。

Remote iOS 界面8
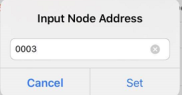
(4)Provisioning部分,可点击Node Addr按键进行节点地址配置(默认地址即可),点击Send进行入网消息发送。
Remote iOS 界面9
(5)PROV LOG 部分可以显示入网进度, Prov Log Send依次为Invite,Start,PublicKey,Confirmation,Random,ProvData,Prov Log Receive依次为Capabilities,PublicKey,Confirmation,Random,Complete。 入网完成进行配置, Config Log Send部分依次显示Composition Get,Appkey Add, Config Log Receive部分依次显示Composition,Success 最终结果如图。
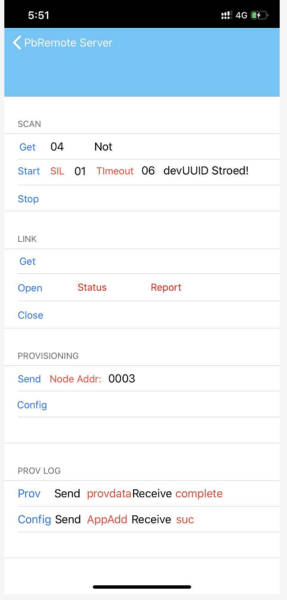
Remote iOS 界面10
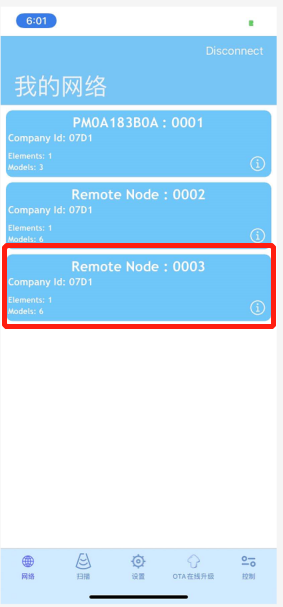
入网结束后返回到主界面可以看到PbRemote入网的节点成功显示在网络界面,如下图。
Remote iOS 界面11
Reset PbRemote Server后可以重新对新的节点进行入网。
1.4.4 Panchip Test Vendor Model
1.4.4.1 概述
Panchip Test Vendor是Panchip开发的对端Client Server。使用该Model时,需要在芯片端勾选Panchip Test Vendor Enable如下,Panchip Test Vendor ID:0x07D1(panchip company id)0x0004(PTV Server),主要的操作功能有:
Proxy自动发包测试
三元组查改选
广播参数配置
并在Vendor操作界面,增加了DFU,Config HeartBeat, Config Relay Set等消息构造。
PTV定义的消息有如下:
Message |
OPCODE |
|---|---|
adv para set |
C0 |
adv para set status |
C1 |
packet count |
C2 |
packet count staus |
C3 |
net test set |
C4 |
net test set status |
C5 |
ptv_three_element_handle |
C6 |
ptv_three_element_reply |
C7 |
构造消息界面截图:
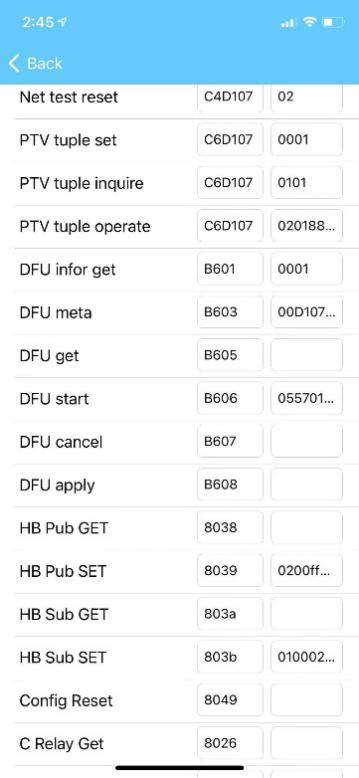
构造消息界面
1.4.4.2 操作方式介绍
1.4.4.2.1 Proxy回包测试
通过Panchip Test Vendor可以测试Proxy收发包情况。
Step1:准备两块Server,代码配置如下:
Step2:入网chip#1(addr 0x0001),chip#2(addr 0x0002),gatt连接chip#1作为proxy。
Step3:进入vendor界面,配置proxy发包间隔300ms点击Proxy auto,观察现象。
通过配置参数,默认参数300ms可以测试proxy节点的通信效率。
1.4.4.2.2 PTV配置三元组
参考天猫精灵小度章节,PTV Model可以替代三元组手动写入方式,三元组数据及三元组查询,操作步骤如下
Step1:点击choose,选择三元组set发送,三元组以char形式写入到芯片端。观察芯片段log及手机端回复消息。
Step2:选择三元组查询。
Step3:选择三元组读取方式。
1.4.4.2.3 Vendor界面配置Config Heartbeat
通过Vendor界面,可以选择Config Heartbeat消息的处理,操作步骤如下:
Step1:HB Sub Get 发送到chip#2,HB Sub Set发送到chip#2;观察手机及芯片Log。
Step2:HB Pub Get发送到 chip#1,HB Pub Set发送到chip#1;观察手机及芯片Log。
注:Heartbeat配置默认配置了chip#1(0x0001)每4s持续发布到0x0002的heartbeat消息,配置了chip#2(0x0002)持续收取源地址为0x0001 目的地址为0x0002的广播包32S。
1.4.4.2.4 Vendor界面配置Config Relay
通过Vendor界面,可以选择Config Relay消息的处理,操作步骤如下:
Step1:Relay消息Set,Get消息发送,观察手机端显示。
1.4.4.2.5 Vendor界面配置Config Reset
通过Vendor界面,可以选择Config Reset消息的处理,操作步骤如下:
Step1:Relay消息Set,Get消息发送,观察手机端显示。
Step2:Reset消息发送,并观察reset node是否成功退网,手机端是否有Reset Status。
1.5 Control
1.5.1 DTS控制
Mesh主要应用于灯控,灯控需要配置相应的PWM,IO灯外设,外设实现通过Zephyer DTS操作方式
1.5.3 heartbeat
Heartbeat tranport层的消息通信,经过配置可以完成以下两个作用:
1) 监测网络
2) 监测网络拓扑结构
通过心跳包配置publication完成设备监控可以在小度使用中体现。
通过心跳包配置subscription可以配置source和destination可以完成指定源及目的地址配置。
Publication配置参考小度实现。
Subscription配置通过手机config消息进行配置,后续应用待拓展说明,配置方式见vendor配置消息如下:
Heatbeat示例参考Panchip Test Vendor Model相关介绍说明。
1.5.5 subscribe&publication
在蓝牙 Mesh里面发消息的动作我们叫做发布(publish)。我想告诉别人什么事情发生或者做什么事情就叫做发布。谁对某些消息感兴趣就可以订阅这些内容。就像是在知乎里面,如果是你对哪个专栏或者内容感兴趣就可以进行订阅。所有发布到这个专栏的文章你都会收到。节点发布消息到单播地址,组播地址或者虚拟地址。节点有兴趣接收这些数据的可以订阅这些地址。
1.6 Function
Function为为适配芯片特性的一些功能以及支持的一些小的功能模块
1.6.1 快速重启退网
快速重启入网通过Zephyr DTS操作flash,需要配置相关的宏使能zephyr flash data区存储功能
CONFIG_BT_SETTINGS=y
CONFIG_FLASH=y
CONFIG_FLASH_MAP=y
CONFIG_NVS=y
CONFIG_SETTINGS=y
1.6.2 校准
校准功能为RF校准功能,由于芯片随温度变化,RF性能可能出现波动
需要ADC模块检测温度,RF模块在合适的时机进行校准
如果需要使用某一校准配置作为存储表生成在Flash中,需要Flash模块温度校准生成温度校准表,后续温度变化至某一范围不需要重新校准,而可以通过读取写入RF相关配置进行快速校准。
1.6.3 BOD
BOD 为芯片支持的上电低电压检测功能,使能以后低电压启动会进行复位
2 Reference
Mesh需要额外的参考工具及参考文档,由下述内容说明
2.1 Reference Tools
Mesh对端测试可以借助多种外界设备进行功能验证/做成相对应的产品或者方案
以下列举了多种测试软件的功能及基础说明。
2.1.1 Nrf Mesh App
nrf mesh app包括IOS/Android两种操作系统的 App,需要在相应的应用商店进行下载,运行时需要打开蓝牙许可权限。
可以验证其作为pb gatt provisioner对 芯片端进行入网,并作为相应的model client 对芯片端进行gatt控制。
Nrf Mesh App可以验证 Output String oob入网方式。
2.1.2 Silicon lab Mesh App
包括IOS/Android两种操作系统的 App,需要在相应的应用商店进行下载,运行时需要打开蓝牙许可权限。
可以验证其作为pb gatt provisioner对 芯片端进行入网,并作为相应的model client 对芯片端进行gatt控制
2.1.3 PanMesh Ios App
PanMesh Ios App 为Panchip 内部开发的IOS 测试Mesh软件
安装方式:
Iphone安装testflight并通过https://testflight.apple.com/join/rS9OwagI安装PanMesh
测试演示功能主要包括如下:
pb gatt 入网
灯控(组控,proxy,relay)
heartbeat
sig ota
pb remote
proxy packet test
etc
2.1.4 天猫精灵Mesh
天猫精灵智能音箱可以作为Pb adv provisioner 对芯片端进行入网,并通过adv方式进行灯控演示
天猫精灵App 可以作为Pb gatt provisioner 对芯片端进行入网,并通过gatt连接方式进行灯控演示
天猫精灵需要对应芯片端实现定时相关的vendor model
天猫精灵需要三元组(pid4,mac6,secret16)共 26Bytes 的三元组信息,来生成对应的Dev UUID,并通过ECC方式(sha256)由三元组生成authvalue,在入网时进行authvalue 云端验证,保证入网流程的正常进行
mesh设备在Provisioning Capabilities阶段提供OOB方式,要求唯一支持Static OOB方式,其中的AuthValue计算过程如下:
AuthValue = SHA256(Product ID,MAC,Secret)。
即:将ProductID,MAC,Secret三元组通过字符串用英文逗号连接,然后进行SHA256摘要计算,取前16字节。注:这里用于计算SHA256的英文字母全部为小写。
三元组在开发者平台注册产品时会生成调试用的三元组,量产三元组请走开发者平台量产流程。
SHA256计算示例
数据字段 |
数据格式与示例 |
计算使用的输入字符串 |
|---|---|---|
Product ID |
十进制数值:168930,对应十六进制数值:0x293e2 |
“000293e2” |
Mac Address |
“AB:CD:F0:F1:F2:F3”(扫描到的蓝牙设备MAC地址) |
“abcdf0f1f2f3” |
Secret |
“53daed805bc534a4a93c825ed20a7063” |
“53daed805bc534a4a93c825ed20a7063” |
连接后字符串 |
“000293e2,abcdf0f1f2f3,53daed805bc534a4a93c825ed20a7063” |
|
SHA256结果输出(HEX) |
c1 c7 67 41 55 32 36 fb 7d a0 a5 86 e6 22 98 c2 31 da c2 88 5e 73 5f eb a6 b8 b441 7c 7d 9e 72 |
|
AuthValue(HEX) |
c1 c7 67 41 55 32 36 fb 7d a0 a5 86 e6 22 98 c2 |
2.1.4.1 三元组生成
三元组数据的详细定义可以参考如下链接:
https://doc-bot.tmall.com/docs/doc.htm?spm=0.7386797.0.0.6e071780ZzBI8F&source=search&treeId=578&articleId=109585&docType=1
通过登录网站https://living.aliyun.com 添加相关新产品,同时生成三元组,添加完成之后,有图所示的结果
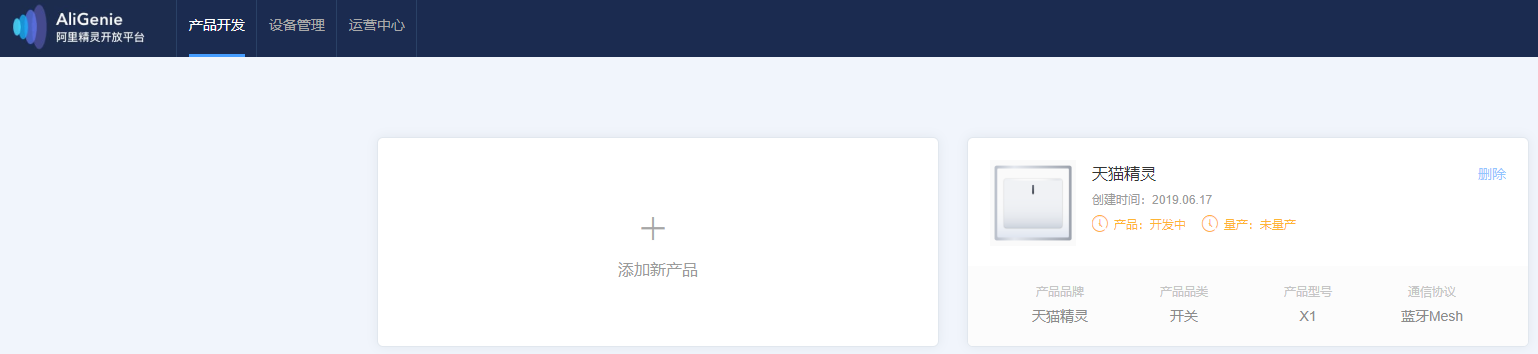
天猫精灵三元组数据生成
三元组生成后,留作芯片端写入接口进行使用
2.1.4.2 天猫精灵操作介绍
(1)在mesh_application工程里打开天猫精灵功能,填入新申请的天猫精灵三元组信息后,编译,生成应用层bin文件,通过Panchip PAN1080 MESH Programmer将应用层bin文件和Profile层bin文件烧录进PAN1080蓝牙模组中。
(2)在芯片运行起来之后,可以先按擦除按键,然后重启,确保芯片处于未配网状态。
(3)按照天猫精灵使用手册,通过天猫精灵手机APP(IOS或Android均可)绑定天猫精灵设备。
(4)对天猫精灵说“天猫精灵,找队友”,在天猫精灵发现智能设备之后对天猫精灵说“连接”,即可对天猫精灵进行配网。
(5)配网成功之后,可以通过语音指令对天猫精灵进行控制。目前支持的语音指令包括: ①“天猫精灵,打开灯”,“天猫精灵,关闭灯”;
②“天猫精灵,将灯的亮度调整为XX%(调整范围为1%-100%)”;
③“天猫精灵,将灯的色温调整为XX%(调整范围为0%-100%)”;
④“天猫精灵,多少时间打开/关闭灯(目前天猫官方只支持定时打开/或者关闭灯,暂不支持定时调整亮度和色温,而且最小定时时间单位为分钟,如果定时不是在整分钟定时,定时可能会有误差)”。
在天猫精灵手机APP中对智能设备进行配置之后,相应的语音指令也会发生变化,用户可以自行摸索。
注: (1)天猫精灵对PAN1080蓝牙模组入网之后,再次进行入网时,需要擦除PAN1080蓝牙模组的配网信息,而天猫精灵手机APP上已显示的设备可以不用解绑。
(2)芯片刚烧录好天猫天猫精灵代码后,模组上的灯会呈现绿色。后续通过天猫精灵操作灯时,灯会呈现白色。
(3)由于我们模组上没有色温灯,目前我们是通过三色灯模拟色温的方式来展现给用户色温调节的效果。色温设置百分比偏低的时候,偏冷色调的蓝色比重会比较大;色温设置百分比偏高的时候,偏暖色调的红色比重会比较大。
2.1.5 小度音箱Mesh
小度智能音箱可以作为Pb adv provisioner 对芯片端进行入网,并通过adv方式进行灯控演示
小度音箱监测设备在线状态可以演示heartbeat的使用
小度音箱需要三元组(pid4,mac6,secret16)共 26Bytes 的三元组信息,来生成对应的Dev UUID,并通过ECC方式(sha256)由三元组生成authvalue,在入网时进行authvalue 云端验证,保证入网流程的正常进行
2.1.5.1 三元组生成
2.1.5.2 小度音箱操作介绍
2.1.6 Amazon Echo Mesh
Amazon Echo智能音箱可以作为Pb gatt provisioner 对芯片端进行入网
Amazon Echo智能音箱可以通过gatt连接方式进行控制,也可以通过adv的方式进行控制
Amazon Echo智能音箱需要适配Amazon pb remote来进行远程入网
Amazon Echo智能音箱(厂商)正在确认和适配Amazon sig ota来进行节点升级